WordPress, configuration and setup for Cloudflare web analytics
Introduction
I would implore people to read this as ‘solutions to issues’ rather than a direct ‘how-to.’ Certain steps will be required but not every step is necessary depending upon your setup. I have three successful WordPress sites using this service and hope this article will shed some light on issues I encountered along the way.
WordPress requirements
WordPress is not required in order to use the service, not at all, but this article is partially aimed at folk using that CMS and need help properly enqueueing external JavaScript files.
- Cloudflare Account
- Read / write permissions to certain
PHPfiles within your WordPress theme.
The process basics
After creating your Cloudflare account and you’ve setup your DNS through Cloudflare, there is a chance it could be a very simple task to get Web Analytics running.
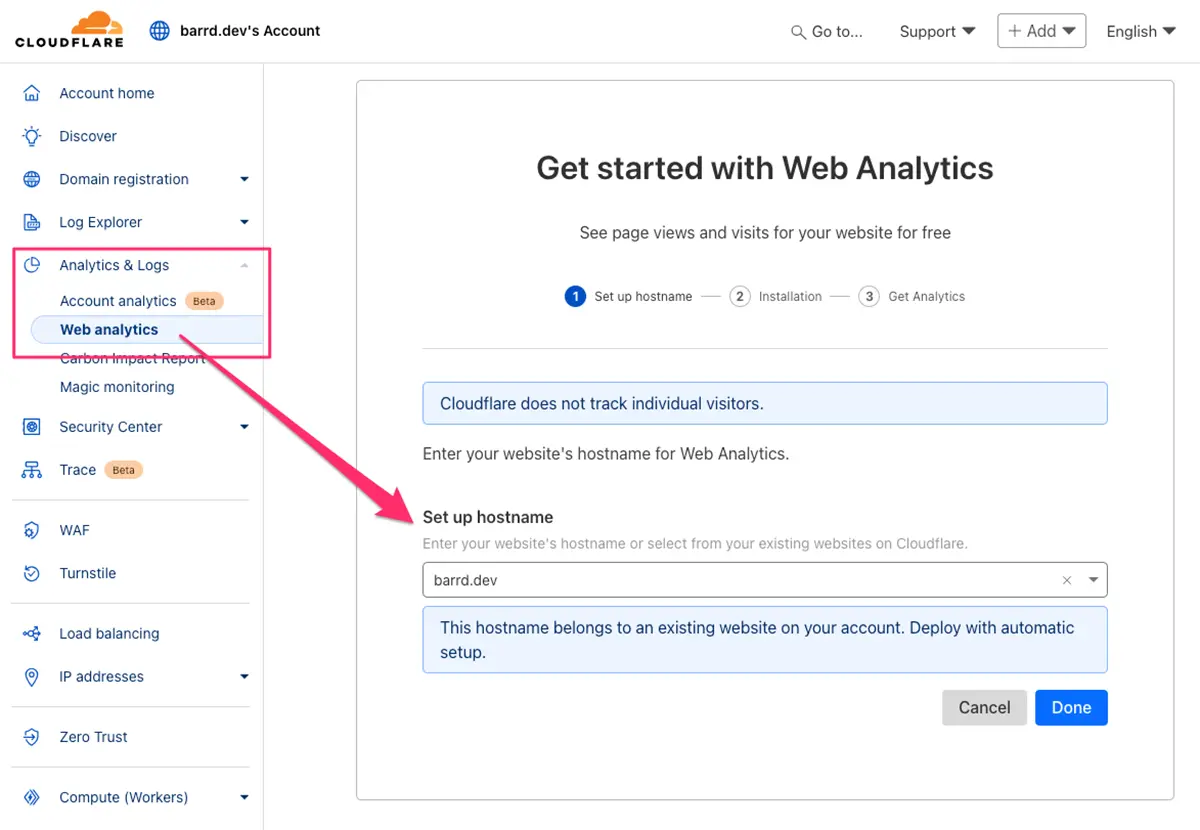
Navigate to Analytics & Logs > Web analytics then as you are typing in the domain it will appear in the dropdown. Select that and a message will appear;
This hostname belongs to an existing website on your account. Deploy with automatic setup.
Click the Done button, skip through the next screen ‘Installation’ as this may not be required, then you’ll end up with the following;
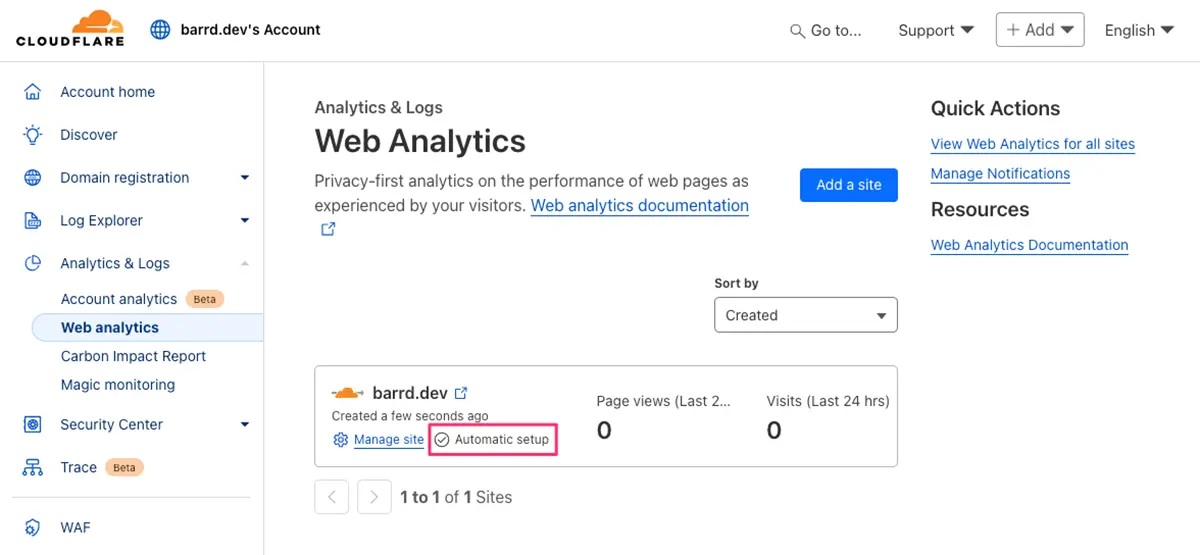
Fingers crossed that works for you
It may, or it may not work. You’ll need to test your site using something like the Tor Browser, or wait for normal traffic to come through.
I found on three separate occasions that it simply did not work for me with a variety of woes (usually JavaScript permission errors.) Even after quite a bit of fruitless research and various attempts at solutions, no joy. But you’re in luck because there is a way to get this working.
No luck? Don’t panic…
Here are some things you can try.
1) Flush Cloudflare cache
By flushing Cloudflare’s caching you may be fortunate and have an easy solution. I have it tuned off as I use other caching methods but it cannot hurt to give it a try. Navigate to Caching > Configuration and click the Purge Everything button.
2) Check ‘A’ records in DNS are set to proxied
If you aren’t still aren’t seeing any page hits and there are no errors in the console the next step is to ensure that your A records are set to Proxied and not DNS only.
Important
Be sure to read the Cloudflare Proxy Status Docs before proceeding to ensure you understand what you’re doing!
Navigate to DNS > Records and you’ll see something similar to;
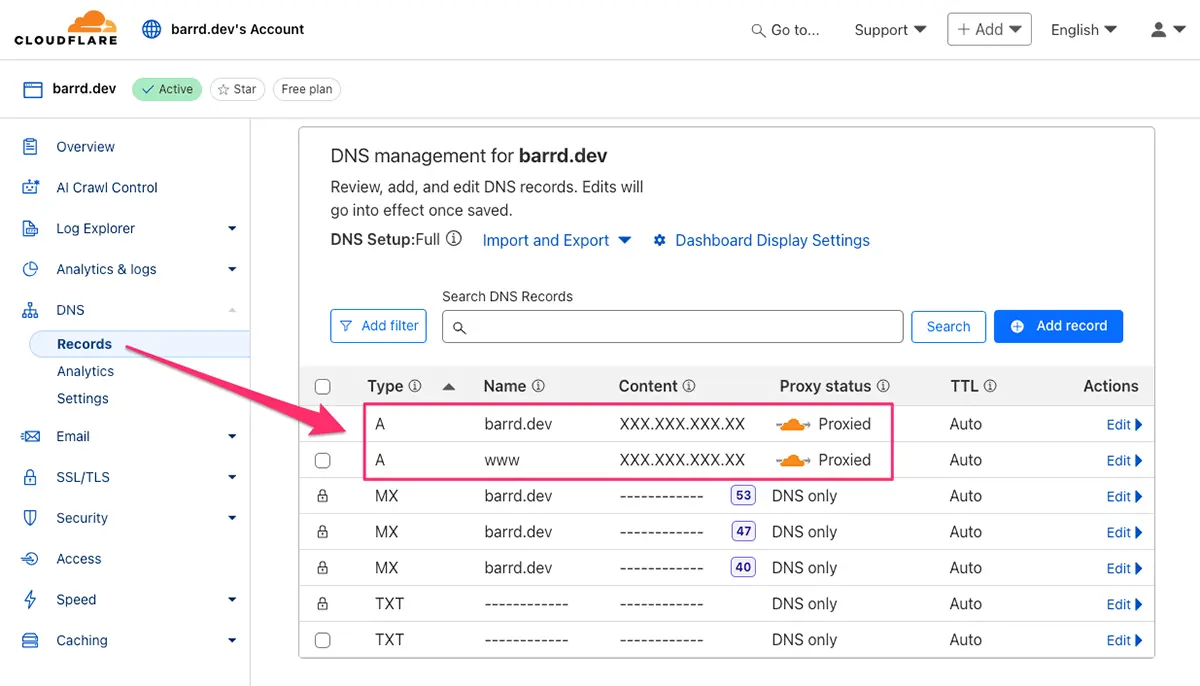
Check the proxied status column and ensure your A records have the orange cloud with the word Proxied next to it. If not, click the appropriate edit button and click the Proxied status button. Give it a while to see if that works, use Tor or wait for external normal traffic.
A modicum of patience is required to get this working with tricky setups. If that works, great, if not read on…
3) Enable with JS Snippet installation
Enabling this option will give you much more flexibility including choosing whether or not to allow analytics at all for EU countries. Click the Web analytics menu option and then click Manage site next to where it shows the text Automatic Setup. You’ll see something like;
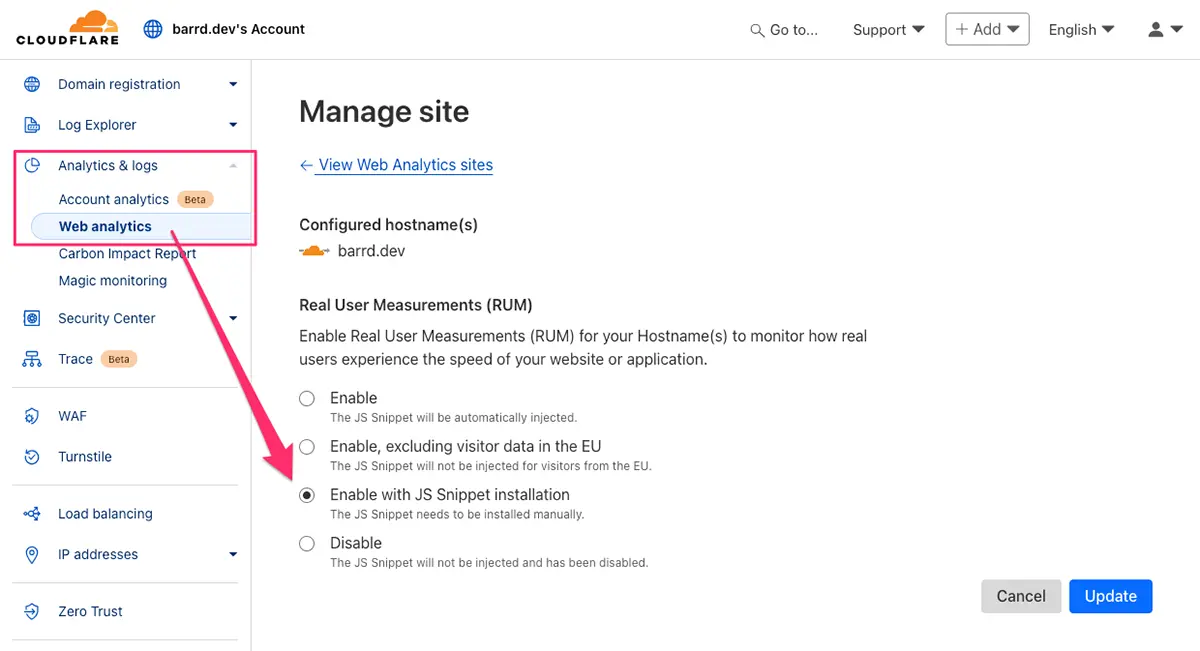
You will be presented with four options;
- Enable
The JS Snippet will be automatically injected. - Enable, excluding visitor data in the EU
The JS Snippet will not be injected for visitors from the EU. - Enable with JS Snippet installation
The JS Snippet needs to be installed manually. - Disable
The JS Snippet will not be injected and has been disabled.
At this point you can ignore (1), (2) as the injection isn’t working anyway & (4), you can choose (3) but make sure you’ve looked into any legal requirements regarding EU countries!
Click the Update button and you’ll be presented with a HTML textarea field containing the JavaScript code you’ll need to manually add to your site. It will look something like;
<!-- Cloudflare Web Analytics -->
<script defer src='https://static.cloudflareinsights.com/beacon.min.js' data-cf-beacon='{"token": "xxxxxxxxxxxxxxxxxxxxxxxxxxxxxxxx"}'></script>
<!-- End Cloudflare Web Analytics -->
Option one, manually add as-is
Whether using WordPress or not, the “easiest” way to add the snippet is to insert into your footer file, read by all pages etc. This will work for most use cases…
Option two, for WordPress users
The “easiest way” isn’t always the correct way to do things. You’ll see several warnings / errors if using PHPCS and WordPress Coding Standards. The proper way (of course) to add any script is by enqueueing it.
- Step 1
Strip out the unneededHTMLcomments wrapping the script. - Step 2
Enqueue the script usingwp_enqueue_script(). - Step 3
Add required attributes using thescript_loader_tagfilter.
Where you add the code depends on your theme setup, I use an /inc folder where I split up PHP functionality into logical blocks and in this case added it to file I named enqueue-scripts.php. You could do something similar or… the default is usually just to add to functions.php.
Remember when adding the code it’ll need to be wrapped in an add_action() using the wp_enqueue_scripts hook somewhere.
The PHP code
// Enqueue Cloudflare Analytics Script.
wp_enqueue_script(
  'cloudflare-web-analytics',
  'https://static.cloudflareinsights.com/beacon.min.js',
  [],
  null,
  [
    'strategy'  => 'defer',
    'in_footer' => true,
  ]
);

// Add 'data-cf-beacon' Attribute to Cloudflare Analytics Script.
add_filter(
  'script_loader_tag',
  function ( $tag, $handle, $src ) {
    if ( 'cloudflare-web-analytics' === $handle ) {
      $token = 'xxxxxxxxxxxxxxxxxxxxxxx';
      $tag   = str_replace(
        'src="' . esc_url( $src ) . '"',
        'src="' . esc_url( $src ) . '" data-cf-beacon=\'{"token": "' . esc_attr( $token ) . '"}\'',
        $tag
      );
    }
    return $tag;
  },
  10,
  3
);
The result
When viewing source (near bottom, around </body>) it will look like;
<script src="https://static.cloudflareinsights.com/beacon.min.js" data-cf-beacon="{"token": "xxxxxxxxxxxxxxxxxxxxxxx"}" id="cloudflare-web-analytics-js" defer data-wp-strategy="defer"></script>Points of interest
wp_enqueue_script()
- The versioning (
$ver) parameter has been set tonull, this may cause a warning (depending on yourPHPCSsetup), it can befixedignored by adding a comment on the same line.// phpcs:ignore WordPress.WP.EnqueuedResourceParameters.MissingVersion - The arguments (
$args) parameter hasdeferset as its optionalstrategychoice which is exactly what we need andin_footerset totrueto echo the code at the foot of the page.
‘script_loader_tag’
- I used
str_replace()to manipulate the$tagstring allowing WordPress to do “its thing” regarding thedefer strategymentioned above.
Final thoughts
Whilst this article may make the whole process seem overwhelming, that was not my intention. I believe it’s well worth the effort to set up, fix the issues and reap the benefits of seeing;
- Core Web Vitals
- Page Load Time
- Visits
- Page views
… which give valuable insights into the general health and state of your hard work being accessed. Give it a try, you can always switch to another system if it’s not for you.
// End of Article
Article Information
Further Reading
- Cloudflare Proxy Status Docs (developers.cloudflare.com)
- Cloudflare Signin/Signup (dash.cloudflare.com)
- Tor Browser Download Page (torproject.org)
- WordPress Coding Standards (developer.wordpress.org)
- WordPress wp_enqueue_script() Docs (developer.wordpress.org)
- WordPress add_action() Docs (developer.wordpress.org)
- WordPress 'wp_enqueue_scripts' Hook Docs (developer.wordpress.org)
About Dave A.K.A. 'barrd'